Let’s break down the process of setting up your first EC2 instance with Terraform to host a basic web server.
Project : Basic EC2 Web Server
- Requirement: Provision and configure a single EC2 instance to run a basic web server.
- Quick Summary:
- Selects an appropriate Amazon Machine Image (AMI).
- Launches an EC2 instance within the previously created VPC.
- Provisions any necessary security groups.
- Utilizes user data scripts to install web server software (e.g., Apache, Nginx) on boot.
Prerequisites
- AWS Account: If you don’t have one already, create a free AWS account (https://aws.amazon.com/).
- Terraform: Download and install Terraform on your computer (https://www.terraform.io/downloads).
- AWS CLI: Install the AWS Command Line Interface (https://docs.aws.amazon.com/cli/latest/userguide/getting-started-install.html). Configure your AWS CLI using your AWS access key and secret key.
- Text Editor/IDE: Use your favorite text editor (like Visual Studio Code, Atom, etc.) to write your Terraform code.
Step-by-Step to follow:
Step 1: Project Setup
- Create a new directory for your project. Let’s name it
ec2-webserver. - Inside the
ec2-webserverdirectory, create a file namedmain.tf. This is where we’ll write our Terraform configuration.
Step 2: Define the AWS Provider
- Open your
main.tffile and add the following code to declare the AWS provider:

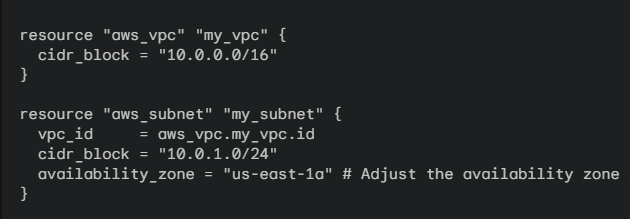
Step 3: Define a VPC (if you haven’t already)
- If you don’t have an existing VPC, create one:
Step 4: Create a Security Group
- Define a security group that allows web traffic (HTTP and HTTPS):

Step 5: Choose an AMI
- Go to the AWS EC2 console and find a suitable Linux AMI (e.g., Amazon Linux 2 or Ubuntu). Note down its AMI ID.
Step 6: Provision the EC2 Instance
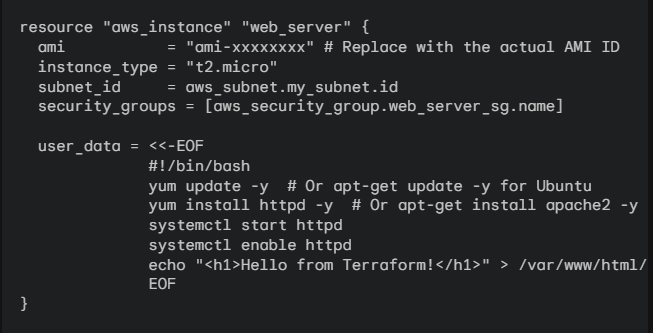
Step 7: Initialization and Deployment
- Initialize Terraform: Open your terminal and navigate to your
ec2-webserverdirectory. Run the commandterraform init. This initializes Terraform and downloads necessary plugins. - Plan the Changes: Run the command
terraform plan. This shows you the changes that Terraform will make, allowing you to review them before applying. - Apply the Changes: Run the command
terraform apply. Answer “yes” when prompted. Terraform will now provision all the resources you defined.
Step 8: Testing
- Get the Public IP: Once Terraform finishes, it will output the public IP address of your EC2 instance. Copy this IP address.
- Test in Browser: Open a web browser and paste the public IP into the address bar. You should see the “Hello from Terraform!” message.
Step 9: Cleanup (Optional)
If you just want to experiment, remember to destroy your infrastructure when you’re finished to avoid incurring unnecessary costs. Run the command terraform destroy and answer “yes” when prompted.
Important Considerations
- Key Pairs: For a production setup, you’ll want to create an EC2 key pair and include it in your instance configuration for SSH access.
- Web Server Choice: The example used Apache. Feel free to adjust for your preferred web server (Nginx, etc.).
- Custom Website: Replace the simple HTML with your website’s files.
- Security Hardening: Consider further security measures beyond the basic security group setup.
Terraform Project 1 – Solution (step by step)
Terraform Project 2 – Solution (Create VPC)
Terraform : 5 Mini Projects to get Hands-on
Kubernetes : 5 Mini Projects to start with
Prometheus and Grafana (5 bite size Projects)
Hope you find this post helpful.
Telegram: https://t.me/LearnDevOpsForFree
Twitter: https://twitter.com/techyoutbe
Youtube: https://www.youtube.com/@T3Ptech