Q.36 Describe the process of setting up a Kubernetes ingress controller.
An ingress controller in Kubernetes handles external traffic routing to services within your cluster. Here’s a typical setup process:
- Choose an Ingress Controller: Several options exist (NGINX, Traefik, HAProxy, etc.). Evaluate based on features, performance, and integration with your environment.
- Deployment: Deploy the selected ingress controller as a Kubernetes deployment. This usually involves a pod running the controller software.
- Configuration: Create Kubernetes Ingress resources. These resources define:
- Routing Rules: How external traffic (based on URLs, hostnames) should be mapped to internal services.
- TLS Termination: (Optional) If you want to enable HTTPS.
- Other Features: Load balancing, path-based routing, etc., may be specified depending on the chosen controller.
- Expose the Controller: Expose the ingress controller’s service, typically using a LoadBalancer service type, to make it accessible from outside the cluster.
Use Cases:
- Exposing Web Applications: Centralized point for handling web traffic (HTTP/HTTPS) to internally hosted web applications.
- Multiple Domains/Paths: Routing different domains or URL paths to separate backend services within the cluster.
- Load Balancing: Distributing incoming traffic across multiple pods of your services.
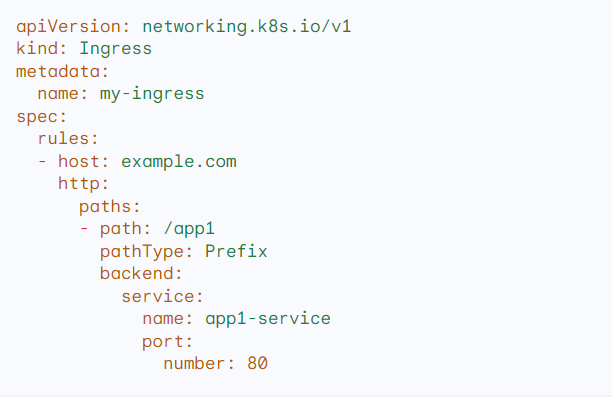
Example:
A basic NGINX Ingress resource:
Q.37 What is the role of a Kubernetes network policy, and how does it enhance security?
Kubernetes network policies act like firewall rules within your cluster, controlling pod-to-pod communication and communication between pods and external endpoints. They improve security by:
- Micro-segmentation: Isolating pods to allow communication only with pods that require interaction. This limits the spread of threats within the cluster.
- Policy-Based Control: Network policies provide fine-grained, declarative rules based on labels, namespaces, IP ranges, and ports. This offers more flexibility than traditional, IP-based firewalls.
- Zero-Trust Approach: Enabling a default-deny stance where traffic is blocked unless explicitly permitted by a network policy.
Use Cases:
- Multi-Tenant Environments: Isolating workloads from different tenants to prevent unintended resource access.
- Sensitive Workloads: Protecting databases and critical services by strictly controlling who can communicate with them.
- Compliance: Assist in meeting regulatory requirements that often mandate network segmentation controls.
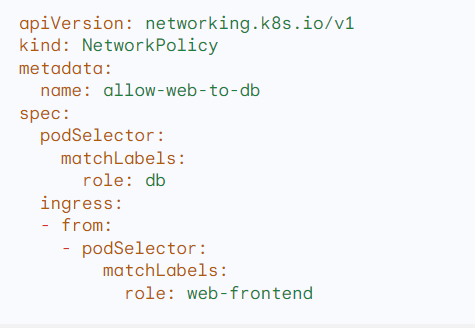
Example:
Network policy to allow ingress traffic only from web-frontend pods to database pods:
Q.38 How can you horizontally autoscale a Kubernetes deployment based on CPU utilization?
Horizontal scaling in Kubernetes means automatically adding or removing pods from a Deployment based on a defined metric. Here’s how to set up horizontal autoscaling with CPU utilization:
- Horizontal Pod Autoscaler (HPA): Deploy a Horizontal Pod Autoscaler (HPA) resource in Kubernetes. This resource continuously monitors metrics.
- Target Metric: Specify the target CPU utilization for your pods. For example, you might target an average CPU usage of 50%.
- Scaling Thresholds: Define the minimum and maximum number of pods you want the deployment to scale between.
- Monitoring: The HPA uses the Kubernetes Metrics Server (or compatible) to access CPU utilization data of pods.
- Automatic Scaling: If CPU usage exceeds the target, the HPA instructs Kubernetes to create more pods. When the usage drops, it reduces the number of pods.
Use Cases:
- Handling Traffic Spikes: Automating efficient response to traffic bursts.
- Resource Optimization: Ensuring your application has enough resources when needed, and avoids unnecessary costs during low-load periods.
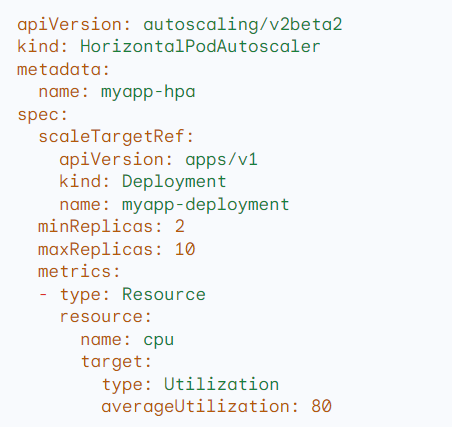
Example:
HPA to scale a deployment based on 80% target CPU utilization:
Q.39 Explain the concept of Kubernetes affinity and anti-affinity rules.
Affinity and anti-affinity rules influence pod scheduling decisions, making the Kubernetes scheduler prioritize or avoid certain nodes.
- Node Affinity: Attracts pods to nodes with specific labels or attributes (e.g., nodes with SSDs, GPU capacity).
- Pod Affinity: Encourages co-location of pods (e.g., keeping the frontend and backend of an application together).
- Pod Anti-Affinity: Spreads pods across nodes or zones to distribute risk and boost resilience.
Use Cases:
- Performance: Place compute-intensive pods on high-performance nodes.
- Resource-specific needs: Match pods with nodes offering required resources.
- High Availability: Prevent a single point of failure by distributing replicas.
- Co-location: Improve network performance for interdependent pods.
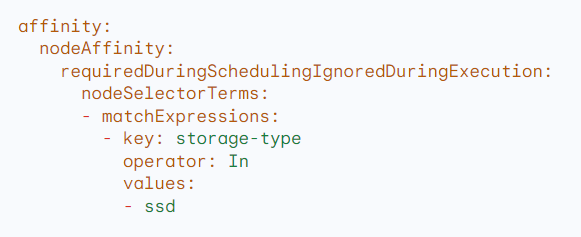
Example:
Node affinity to schedule pods on nodes with an ‘ssd’ label:
Q.40 How do you troubleshoot and diagnose performance issues in a Kubernetes cluster?
Troubleshooting Kubernetes performance is a systematic process of:
- Metrics: Leverage tools like Prometheus, Grafana for cluster-wide resource monitoring (CPU, memory, network).
- Logging: Utilize container and application logging to trace errors and potential bottlenecks.
- Profiling: (if needed) Employ profiling tools to analyze application code for performance hotspots.
- Node-level issues: Examine host-level metrics for disk I/O or system bottlenecks.
- Networking: Check for routing problems, load balancer errors, or service misconfigurations.
- Kubernetes Resources: Examine if limits, requests, or configurations are causing resource contention.
Use Cases:
- Slow Applications: Identify the root cause of performance degradation.
- Resource Bottlenecks: Pinpoint areas where resources are strained.
- Error Detection: Uncover problems indicated by logs or unusual metrics.
Example:
- Using kubectl describe pod <pod-name> to inspect resource requests, limits, and container states.
- Using kubectl top nodes and kubectl top pods to identify nodes/pods with excessive resource usage.
Part 1- Kubernetes Interview Q & A (Q1-Q5)
Part 2- Kubernetes Interview Q & A (Q6-Q10)
Part 3 – Kubernetes Interview Questions & Answers (Q.11 to Q.15)
Part 4 – Kubernetes Interview Questions & Answers (Q.16 to Q.20)
Part 5 – Kubernetes Interview Questions & Answers (Q.21 to Q.25)
Part 6 – Kubernetes Interview Questions & Answers (Q.26 to Q.30)
Part 7 – Kubernetes Interview Questions & Answers (Q.31 to Q.35)
Hope you find this post helpful.
Telegram: https://t.me/LearnDevOpsForFree
Twitter: https://twitter.com/techyoutbe
Youtube: https://www.youtube.com/@T3Ptech